Washing & Drying
How to Wash a Car Without Scratching It
Learn how to wash a car without scratching the paint. Covers pre-rinse, two-bucket method, mitt choice, top-down technique, and safe drying.
Most swirl marks don't come from rock chips or parking lot dings. They come from washing. A sponge dragged across a dusty hood, a bucket of water collecting grit all morning, a dirty chamois flipped back and forth: each pass grinds abrasive particles against a clear coat that's only a few microns thick. The fix is almost entirely technique and gear, not expensive products.
Here's how to wash a car safely, from the first rinse to the last dry pass.
Why scratches happen during washing
Paint scratches come down to trapped abrasives. When you wipe a panel, any dirt between the mitt and the surface acts like sandpaper. The finer the swirl, the smaller the particle, but over dozens of washes, fine swirls add up to the hazy, dull finish that makes older cars look tired even when they're clean.
The three main culprits:
- Wrong contact media. A sponge holds grit against the surface. A quality wash mitt releases it into the water below.
- One dirty bucket. Dipping a contaminated mitt back into your wash solution reintroduces everything you just removed.
- Skipping the pre-rinse. Dry wiping a dusty panel, even gently, is an easy way to put light scratches in paint.
Understanding this makes every step below make sense.
Gather your supplies before you start
A safe car wash technique depends less on brand names and more on having the right categories covered:
- Two buckets (5-gallon minimum), each with a grit guard at the bottom
- A dedicated wash shampoo (not dish soap, which strips wax and sealants)
- A high-quality microfiber wash mitt or lambswool mitt
- A pre-rinse method: garden hose with a good nozzle, or a pressure washer on a fan/soap setting
- Wheel-specific brush and wheel cleaner
- Microfiber drying towels or a forced-air blower
Optional but worth considering: a foam cannon or foam gun for a thick pre-soak layer. If you're weighing your options there, this breakdown of foam cannon vs foam gun covers what each one actually does and when the extra cost is justified.
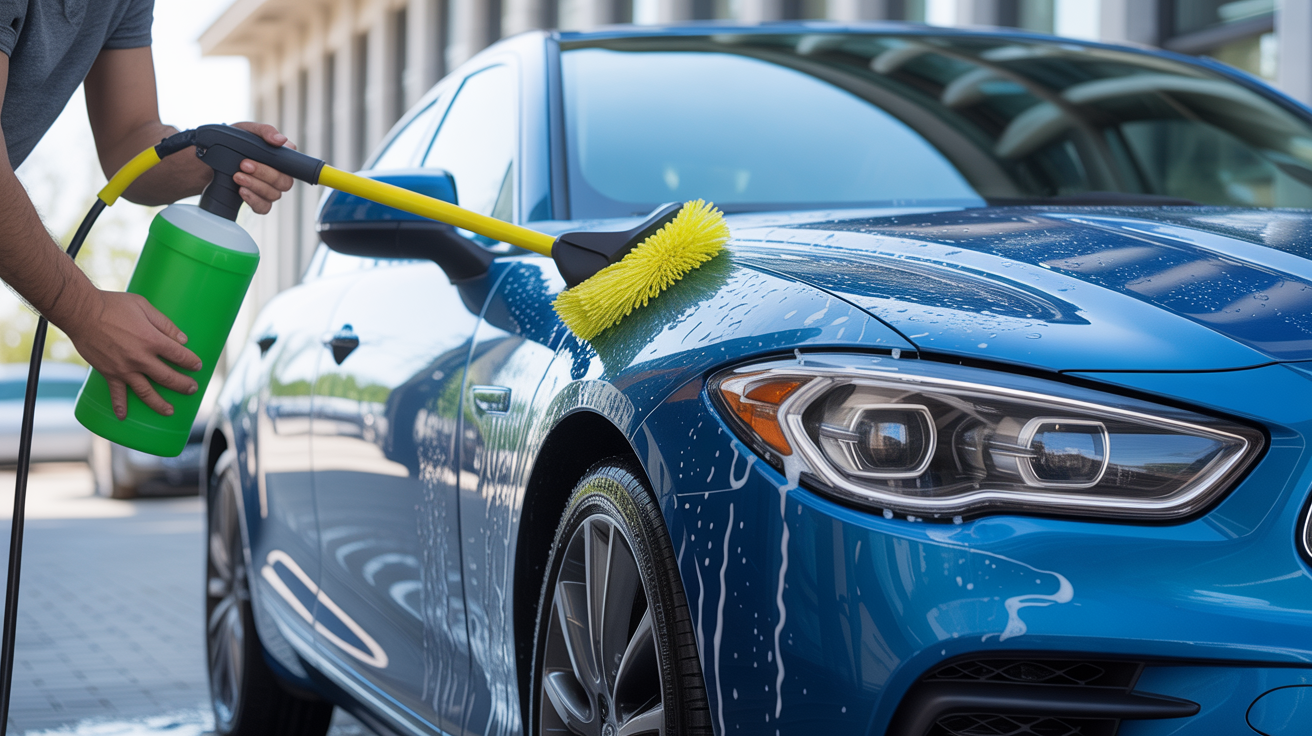
Step 1: Start with the wheels
Wheels collect brake dust, road tar, and iron contamination. Clean them first so that spray-back doesn't land on paint panels you've already washed. Use a dedicated wheel cleaner and a brush sized to fit your barrel and spokes. Rinse thoroughly before moving on.
Do this while your car is still dirty. It sounds counterintuitive, but cleaning wheels last means contaminated rinse water hits clean paint.
Step 2: Pre-rinse the entire car
A proper pre-rinse removes loose dirt, pollen, and surface debris before anything touches the paint. This step alone eliminates a large share of potential swirl risk.
Work top to bottom: roof, windows, hood, trunk, doors, lower panels, bumpers. Use enough water pressure to actually move debris off the surface rather than just wetting it. A pressure washer on a 25-degree or fan nozzle works well; a hose with a jet nozzle works if you keep it close to the surface.
If you have a foam cannon, this is when you apply your pre-soak layer. Let it dwell for 30 to 60 seconds (not so long it dries), then rinse again before contact washing. That dwell time softens bonded grime and reduces how hard your mitt has to work.
Step 3: Set up the two-bucket system
The two-bucket wash method is the most reliable way to keep abrasives out of your wash solution. The concept is simple:
- Bucket 1 (wash bucket): Clean shampoo solution. This is what you load your mitt from.
- Bucket 2 (rinse bucket): Plain water. After washing a panel, rinse your mitt here before reloading with soap.
The grit guard at the bottom of each bucket is not decorative. It holds the dislodged dirt below the waterline so your mitt doesn't pick it back up when you dip in.
| Bucket | Contents | Purpose |
|---|---|---|
| Wash | Shampoo + water | Load mitt with clean soap |
| Rinse | Plain water | Agitate mitt to release dirt |
After rinsing the mitt in bucket 2, wring it out, then dip into bucket 1 to reload. Never go directly from panel to wash bucket.
Step 4: Wash in straight lines, top to bottom
Technique during the contact wash matters as much as your setup. A few rules that prevent scratches:
Work top to bottom. The lower panels (rocker panels, bumpers, rear valance) carry the most contamination. Washing them last means that grime doesn't get redistributed upward onto cleaner paint.
Use straight, overlapping passes. Circular motions trap dirt and concentrate pressure in a tight arc. Straight passes release grit more consistently and are easier to control.
Wash one panel at a time. Roof, then driver-side door, then rear door, and so on. Rinse the panel before the suds dry.
Light pressure. The mitt does the work. If you're pressing hard, the panel wasn't pre-rinsed well enough.
Reload your mitt from the wash bucket between panels. Rinse in the rinse bucket between each pass. This sounds tedious until you've seen the amount of dirt a single panel deposits into the rinse bucket.
Safe car wash: what to do and what to avoid
| Do | Don't |
|---|---|
| Use a microfiber or lambswool mitt | Use a sponge or household rag |
| Pre-rinse thoroughly before contact | Wipe dry or dusty paint |
| Wash in shade or when panels are cool | Wash in direct sun (soap dries fast) |
| Use car-specific shampoo | Use dish soap or all-purpose cleaner |
| Use two buckets with grit guards | Use one shared bucket |
| Wash panel by panel, top to bottom | Wash the whole car then rinse |
| Rinse mitt in the rinse bucket between panels | Dip a dirty mitt back into your soap solution |
Step 5: Final rinse
Once all panels are washed, do a complete rinse from top to bottom. For a sheeting rinse (which speeds drying), remove the nozzle and let water flow freely over horizontal surfaces. The water sheets off rather than beading, which means fewer droplets to dry.
Pay attention to seams, mirrors, door handles, and badges. Water hides in every crevice and drips back onto panels you've already dried if you skip this step.
Step 6: Dry without water spots
How you dry matters as much as how you wash. Letting a car air-dry creates water spots, especially with hard water. The minerals in the water don't evaporate — only the water does, leaving deposits behind.
For the safest drying pass, use a large, plush microfiber drying towel and blot rather than drag. Alternatively, a forced-air blower removes water from crevices without any contact at all. For a full walkthrough of both approaches and the products worth considering, this guide on how to dry a car without water spots covers the details.
Start with the roof and glass, then work down. Keep a separate towel for lower panels.
FAQ
How often should I wash my car? Every one to two weeks is a reasonable baseline for daily drivers in normal conditions. Cars parked outside under trees, near coastal air, or in areas with heavy road salt may need washing more frequently. Letting contamination sit too long (bird droppings and industrial fallout in particular) can etch clear coat over time.
Can I use dish soap to wash my car? Dish soap strips wax, paint sealants, and ceramic coating protection. It cleans in the short term but degrades your paint protection quickly. Use a pH-neutral car shampoo designed for painted surfaces.
Is a pressure washer safe for car paint? Yes, with the right setup. Use a wide-angle nozzle (25 to 40 degrees), keep it 12 to 18 inches from the surface, and avoid pointing it at rubber seals, decals, or convertible tops at close range. High-pressure water itself doesn't scratch paint — grit does.
What's the best wash mitt material? Microfiber chenille mitts are the most common choice. They hold a lot of water, release dirt into the rinse bucket effectively, and are machine washable. Lambswool is another good option. Avoid sea sponges and synthetic sponges, which hold grit against the paint surface.
Why does my car still have swirls after switching to the two-bucket method? A few possibilities: the pre-rinse wasn't thorough enough, the mitt is worn or contaminated from previous washes, or the drying step is introducing scratches. Check your mitt for embedded particles by running it across a light source. If you see glints, it needs a deep wash or replacement. Drying technique is often the overlooked variable.