Washing & Drying
How to Wash a Car at Home, Step by Step
Learn how to wash a car at home with the right technique, order of operations, and products to get a clean finish without causing swirls or scratches.
Washing your car at home takes about 45 minutes and, done with the right products and sequence, produces a cleaner result than most drive-through tunnels. The goal is to work top to bottom, keep the paint lubricated with suds, and never let dirty water dry on a panel.
What You Need Before You Start
Good results come down to having the right supplies within arm's reach before the first drop of water touches the car. Running back to the garage mid-wash with soapy hands is how missed spots happen.
Products
- Car wash soap (not dish soap, which strips wax and paint sealants)
- Two buckets (one for soapy water, one for rinsing your wash mitt)
- Grit guards for each bucket (they trap dirt below the wash zone so it doesn't reload onto your mitt)
- Microfiber wash mitt or genuine lamb's wool mitt
- Dedicated wheel brush (keep it separate from anything that touches the paint)
- Wheel cleaner spray
- Large plush drying towel (microfiber, at least 400 GSM)
- Quick detailer spray for use as a drying aid (optional but helpful)
Conditions
Avoid washing in full direct sun, particularly on a summer afternoon when panel temperatures can reach 140°F (60°C). Water and soap evaporate too fast, leaving residue that streaks and spots. Overcast skies, early morning, or late afternoon are the best times for a driveway car wash.
Step 1: Wheels and Wheel Arches First
Wheels and arches collect the heaviest contamination on the car. Brake dust, tar, and road film can splash onto freshly washed paint if you do the wheels after the bodywork. Handle them first, while the rest of the car is still dry.
Spray wheel cleaner on each wheel, let it dwell for 30 to 60 seconds (follow the product label), then agitate with your dedicated brush. Work the face, the spokes, and then the inside barrel if you can reach it. Rinse each wheel completely before moving on. Hit the arches and lower rockers too.
Once all four wheels are rinsed, set that brush aside. It should never touch a painted panel.
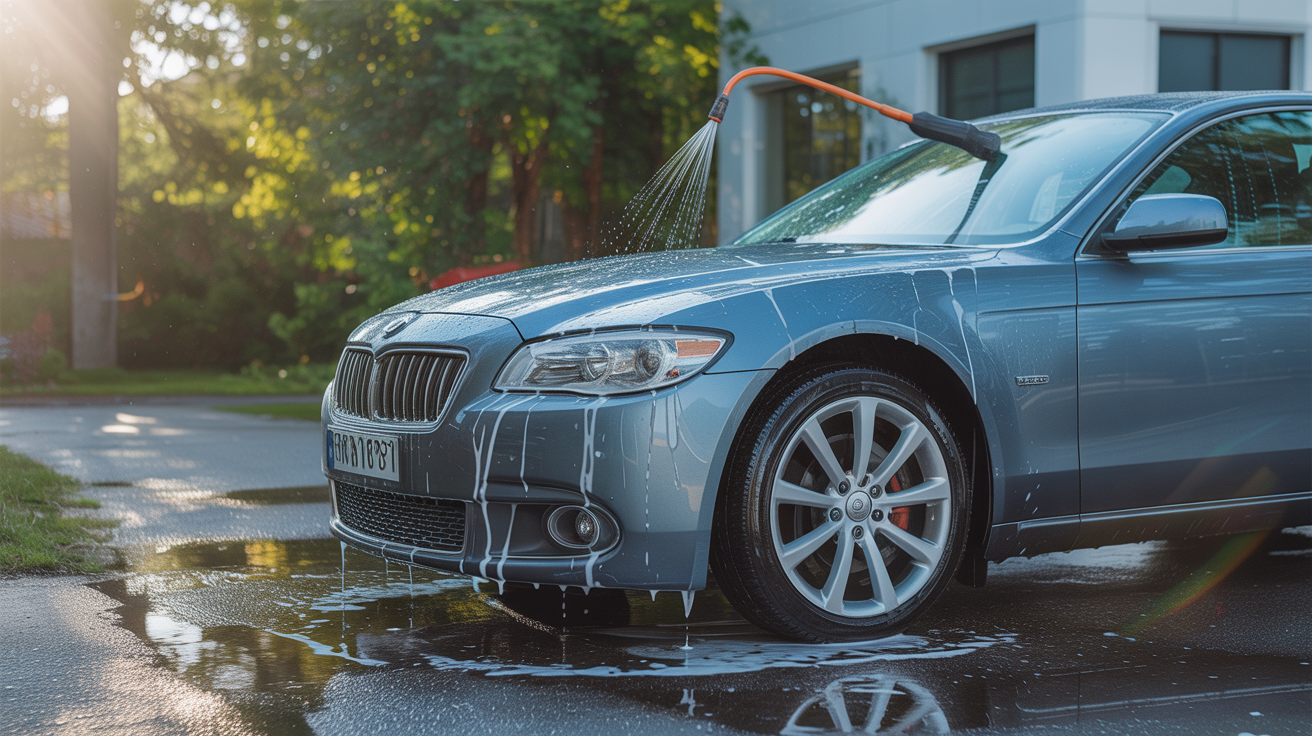
Step 2: Pre-Rinse the Whole Car
A pre-rinse floats loose surface dirt off the paint before anything physically contacts it. Use a garden hose with a spray nozzle set to a gentle fan, or a pressure washer fitted with a 25- or 40-degree tip held at least 12 inches (30 cm) from the surface. Start at the roof and work down, letting water carry contamination toward the ground.
Pay extra attention to the windshield base, door jambs, lower body panels, and anywhere mud or road film tends to pool. After a minute or two of rinsing, the car should look noticeably cleaner even without soap. That's the right starting point.
Step 3: The Two-Bucket Wash
This is where most people either protect the paint or accidentally introduce the fine swirls they'll spend hours trying to correct. The two-bucket wash method is the standard for good reason: one bucket holds your soapy water, the other holds clean rinse water. Before reloading your mitt with soap, dunk it in the rinse bucket and rub it against the grit guard to release trapped dirt, then transfer it to the soap bucket and reload.
Soap Dilution
Mix car wash soap to the manufacturer's stated ratio. Most concentrate formulas call for 1 to 2 oz (30 to 60 ml) per gallon (3.8 L) of water. Generous suds carry lubrication that lets the mitt glide rather than drag.
Panel Order and Stroke Direction
Work from the roof down: roof first, then the hood and trunk lid, then upper doors and fenders, and finally the lower panels, rockers, and bumpers. Those lower sections accumulate the most grit. Washing them last keeps heavy contamination away from cleaner paint.
Keep each pass to a manageable section, roughly 2 to 3 square feet (0.2 to 0.3 m²). Long, overlapping straight strokes work better than circular scrubbing. Rinse each section with the hose before moving on so soap doesn't start drying on the surface.
For anyone who wants to go deeper on protecting paint during a wash, this guide covers how to wash a car without scratching it in more detail.
A Panel-by-Panel Sequence
- Roof
- Hood
- Trunk lid
- Rear windshield (glass only)
- Upper doors and fenders (left side, then right)
- Lower doors and fenders
- Rockers and lower bumpers
- Front windshield
Step 4: Final Rinse
Once you've washed every panel, do a full rinse from top to bottom. If you're using a garden hose, remove the nozzle and let water sheet off the surfaces rather than spray. Sheeting water carries residue away more completely and leaves less standing water on flat panels, which speeds up drying.
Check that all soap is cleared before you touch a drying towel. Soap trapped under a towel will smear, and on a warm day it dries surprisingly fast.
Step 5: Drying Without Water Spots
Air-drying looks harmless but reliably leaves water spots, especially if your tap water has high mineral content. Those spots are calcium and magnesium deposits that can bond to paint protection and, over time, etch into clear coat.
Use a large plush microfiber towel, 400 GSM or heavier. Lay it flat on the panel and drag it across the surface rather than scrubbing. Misting a drying aid or quick detailer onto each panel before the towel touches it adds lubrication and improves the gloss.
Start at the roof and work down. Flip or fold the towel to a clean section when one side becomes saturated. A 500-GSM waffle-weave or twist-pile drying towel can handle a midsize car before it needs wringing out.
More detail on preventing mineral deposits while drying is in this guide on how to dry a car without water spots.
Getting the Gaps
Door jambs, the fuel door recess, trunk gaps, and mirror housings all trap water that drips out a minute after you think you're done. Open each door and the trunk, dry the sill and the interior frame edge, and press the towel briefly into gap areas. A leaf blower or a low-pressure air nozzle clears water from these spots quickly without touching the paint.
Optional Finishing Step: Quick Detail Spray
Once the car is dry, a quick detailer adds a thin layer of protection and deepens the finish. Fold a clean microfiber into a flat applicator pad, spray 2 to 3 times per panel, and buff in straight passes with light pressure. This takes about 5 minutes and leaves the result looking noticeably better than drying alone.
Common Mistakes Worth Avoiding
| Mistake | Why It Causes Problems |
|---|---|
| Using dish soap | Strips wax and paint sealants, dries rubber seals over time |
| One bucket only | Dirty mitt reapplies grit directly to the paint |
| Washing in direct sun | Soap dries before you can rinse, causes streaks and water spots |
| Starting with lower panels | Drags heavy road grime up onto cleaner sections |
| Air-drying | Mineral deposits leave hard water spots |
| Using a household sponge | Traps dirt at the contact point, no real lubrication |
Frequently Asked Questions
How often should I wash my car at home?
Every 1 to 2 weeks is the right cadence for most cars. If you park outside, drive in heavy traffic, or live somewhere with road salt, tree pollen, or bird activity, lean toward weekly. Letting contamination sit for months allows it to bond to the paint and become much harder to remove.
Can I use dish soap instead of car wash soap?
No. Dish soap is formulated to cut grease, and it does that job on wax, sealants, and polymer coatings too. Car wash soaps are pH-balanced to clean without stripping protection. If you've run out, a rinseless wash product diluted in water is a better emergency substitute than dish soap.
What if I only have one bucket?
You can partially compensate by rinsing your mitt under a running hose before reloading with soap each time. It's not as effective as a dedicated rinse bucket with a grit guard, but it removes most surface grit from the mitt. Even this step is a significant improvement over dunking a dirty mitt back into the soapy wash bucket.
Do I need a pressure washer for a home car wash?
No. A garden hose with a decent spray nozzle handles the pre-rinse and final rinse without trouble. Pressure washers are helpful for blasting wheel arches and cutting through heavy road film, but they're not required. If you use one, stick to a 25- or 40-degree tip and keep it at least 12 inches (30 cm) from the paint to avoid lifting edges or forcing water under rubber trim.
Why does my car still have water spots after washing?
Hard water is the usual culprit. If your tap water has high mineral content, the calcium and magnesium salts it leaves behind dry into visible deposits. Drying the car promptly rather than letting it air-dry makes the biggest difference. If the problem persists, a filtered hose nozzle, a distilled-water final rinse, or a dedicated water-spot remover applied after drying will address it.