Wheels & Tires
How to Clean Wheel Wells and Barrels
Learn how to clean wheel wells and barrels properly, from the right tools and degreasers to rinsing order and dressing plastic liners.
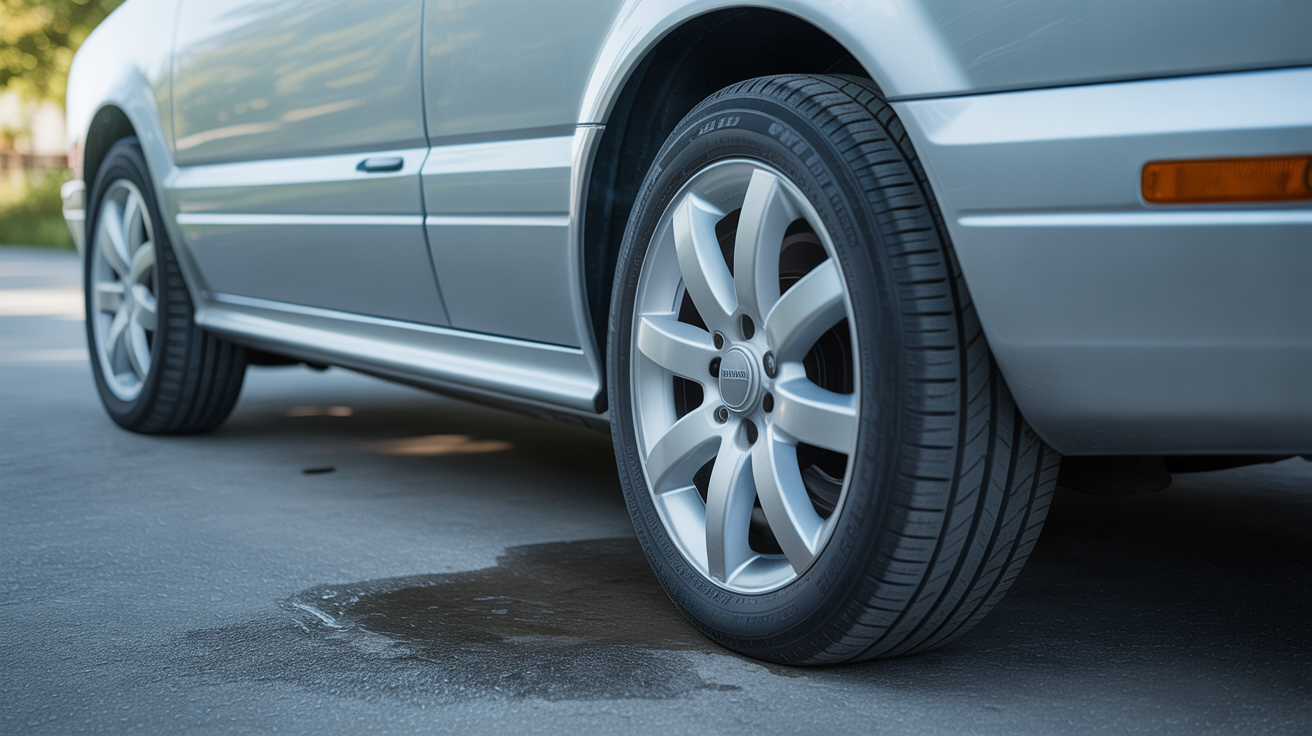
Most detailers spend real time on the face of the wheel and leave the well and barrel as an afterthought. It shows. A gleaming rim with a mud-caked arch above it undercuts the whole job. Wheel wells collect road film, brake dust, oil mist, and compacted grit faster than almost any other surface on the car, and the barrel of the wheel, the inner lip and spokes facing the caliper, gets coated with the same baked-on residue that kills a quality finish over time.
Doing this right takes maybe twenty minutes per corner when you build it into your wash routine. Skip it for a few months and you are looking at stubborn grease that normal shampoo will not touch.
Why wheel wells and barrels get neglected
The honest answer is access. The well is recessed, awkward, and usually black plastic, so dirt hides easily. The barrel sits behind the spokes and faces inward, invisible from outside the car. Neither surface gets much attention during a quick rinse.
There is also a tool gap. A wash mitt does not reach into a barrel, and a standard sponge bounces off the irregular texture of a plastic liner. Without purpose-built brushes, the job feels harder than it is.
Neglect has real costs. Accumulated grit and moisture accelerate rust on exposed metal surfaces inside the well. Brake dust baked onto the barrel bonds to clear coat and becomes harder to shift with every heat cycle. Plastic liners get chalky and brittle when they stay coated in road oil without any UV protection.
What you need before you start
Having the right tools makes this a 20-minute job instead of a frustrating one.
Tools list:
- Wheel woolie or long-handled barrel brush (at least 12 inches of reach)
- Stiff-bristle well brush or utility scrub brush
- Short wheel detailing brush for tight spoke gaps
- Garden hose or pressure washer
- Microfiber or cotton towels for drying
- Plastic applicator pad or foam brush (for liner dressing)
Products:
- All-purpose cleaner (APC) diluted 4:1 for light wells
- Dedicated degreaser or stronger APC at 1:1 or full strength for heavy grease buildup
- Wheel cleaner (iron-dissolving or pH-neutral) for the barrel and rim face
- Plastic/rubber dressing for the liner, matte finish preferred
If you have not covered the basics of cleaning the rim face yet, start with how to clean car wheels and rims before tackling the barrel.
Turning the wheel vs. removing it
You have two options for getting to the barrel: turn the steering wheel to one side and work through the gap, or pull the wheel off entirely.
For a regular maintenance wash, turning the wheel gives you enough access. Cut the wheels hard left to expose the right barrel, and hard right for the left. You can reach most of the inner surface with a long woolie and rinse freely without worrying about brake fluid or hardware.
For a proper detail, decontamination pass, or any car where the barrels are genuinely caked, remove the wheel. Working off the car you can clean every inch of the barrel, get behind the spokes, and address the hub face properly. It also lets you inspect brake components while you are in there. If you find a heavy coating of brake dust while you are at it, check out how to remove brake dust from wheels for the right approach.
Step-by-step: how to clean wheel wells and barrels
Work one corner at a time. Do not let product dry on any surface before rinsing.
Step 1: Pre-rinse the well and barrel. Blast out loose dirt with a hose or pressure washer before applying anything. A pressure washer on a 25-degree tip handles packed grit in the liner channels. Get the barrel from behind the spokes as best you can at this stage.
Step 2: Apply degreaser to the well. Spray your APC or degreaser liberally onto the plastic liner and the surrounding metal. For a car that has not been detailed recently, go stronger, 1:1 or straight degreaser on grease buildup around the strut housing and inner fender. Let it dwell for 60 seconds. Do not let it dry.
Step 3: Scrub the liner. Use a stiff utility brush to work the textured plastic. The grain in the liner traps grit and you need mechanical action to pull it out. Work top to bottom so dirty runoff falls onto unscrubbed areas you are about to hit.
Step 4: Address the inner fender and metal edges. Some cars have exposed sheet metal in the well. Scrub those sections with the same brush. Hit any rubber splash guards or inner fender clips while you have the brush loaded.
Step 5: Apply wheel cleaner to the barrel. Spray an iron-dissolving or pH-neutral wheel cleaner on the inner barrel and spokes. These cleaners react with brake dust and iron contamination on contact. If you see the product turn purple, that is iron particles oxidizing and releasing from the surface.
Step 6: Scrub the barrel with a woolie. Push a long-handled woolie through the spoke opening and work it around the inner barrel in overlapping passes. Reload with cleaner if needed. For tight spoke channels, switch to a short detailing brush. The goal is to touch every inch of the inner surface.
Step 7: Rinse everything thoroughly. Start from the top of the well and rinse downward, pushing contaminated runoff out and away from the car. Get the barrel from multiple angles. Any cleaner left to dry inside the barrel will leave water spots or residue.
Step 8: Dry the well. Use a towel to wipe down the liner and accessible metal. You do not need to get every drop from deep in the barrel, but drying the liner surface prevents water sitting on the plastic and leaving mineral deposits.
Step 9: Dress the liner. Apply a water-based plastic dressing to the liner using a foam brush or applicator pad. Spread it evenly and let it absorb for a minute, then wipe off any excess. Avoid silicone-heavy dressings that go on glossy. A liner that looks like it was dipped in armor-all looks out of place and the shine draws attention to every speck of dust that lands on it after. Matte finishes look intentional and last longer without re-application. Do not spray dressing on the barrel itself or anywhere near brake components.
Step 10: Finish the rim face. Once the well is done, move to the outer face of the wheel. After you apply tire dressing to the sidewall, keep it off the rim. For that step, how to apply tire shine the right way covers the technique.
Degreaser vs. all-purpose cleaner: which to use
The distinction matters. An all-purpose cleaner at a moderate dilution works well for routine maintenance where there is road film and light dust. A true degreaser, or APC at full concentration, is what you need when there is visible grease around suspension components, axle boots, or anywhere near the CV joint area.
Do not default to full-strength chemicals every time. They work faster but can be hard on rubber seals and plastic clips if left on too long. For most clean wheel wells after a month of regular driving, a 4:1 APC does the job without the risk.
How often to do this
Every full detail, without exception. For daily drivers in wet climates or on roads treated with road salt, the well should get a proper scrub every two to three washes. Brake dust accumulates proportionally to how much you drive, so the barrel cleaning schedule tracks your mileage more than the calendar.
FAQ
Do I need to remove the wheel to clean the barrel properly? Not for routine cleaning. Turning the steering wheel gives you enough access for regular maintenance. Removing the wheel is worth it once or twice a year for a thorough job and lets you get behind the spokes without awkward angles.
Can I use the same brush on the barrel and the liner? You can, but a stiff utility brush that works well on a textured liner is too aggressive on a painted or clear-coated barrel. Use a softer wheel woolie or detailing brush for the barrel and save the stiff brush for the liner and well.
Will iron-dissolving wheel cleaner damage my plastic liners? Iron remover is generally safe on plastic but check the product label. Most are pH-balanced formulas designed for use on wheels where rubber and plastic are present. Avoid leaving them on for more than a few minutes and rinse thoroughly.
What dressing is safe for wheel well liners? Water-based, non-greasy plastic restorers are the right call. Avoid petroleum-based dressings, which attract dust and can degrade rubber over time. Products labeled for trim, plastic, or rubber work well; just confirm they are safe for unpainted surfaces.
My wheel wells have rust spots on the metal. Can I treat those while I am cleaning? Yes. After cleaning and drying, a light application of a rust converter or iron inhibitor on the affected spots slows further oxidation. This is not a permanent fix for serious rust, but it extends the surface and is easy to work into the well cleaning routine.