Paint Care & Polishing
How to Use a Clay Bar on Car Paint
Learn how to clay bar a car step by step: prep, lube, technique, and what to do after to protect your paint.
If you've washed your car twice and the paint still feels rough under your fingertips, the problem isn't dirt. It's bonded contamination: brake dust particles, industrial fallout, rail dust, tree sap mist, and overspray that are physically embedded in the clear coat. A wash bucket and a microfiber mitt won't touch them. A clay bar will.
This guide covers everything you need to clay bar a car correctly, from testing whether you actually need it to protecting the paint once the surface is clean.
What a clay bar actually does
Paint contamination falls into two categories. Surface dirt washes off. Bonded contaminants don't. When metallic particles land on warm clear coat, they start to oxidize and anchor themselves into the top layer of paint. Over months or years, a car parked near a rail line or industrial area can accumulate hundreds of these tiny embedded specks, and they act like sandpaper against anything that moves across the paint.
A clay bar is a pliable, synthetic compound that shears off these bonded particles with a combination of mild abrasion and mechanical grab. It's not a polish and it doesn't fill scratches. It prepares the surface by removing what polishing, washing, and waxing cannot.
Claying also removes brake dust fallout, tar spots (the small soft ones, not large deposits), fresh overspray, and water spot residue that hasn't etched through the clear coat. If contamination has etched or scratched the paint, you'll need to remove swirl marks and light scratches with a separate polishing step.
The baggie test: find out if you need to clay
Before pulling out clay, do the baggie test. Wash and dry the car first. Then put your hand inside a clean plastic sandwich bag and run it flat across the paint on a panel you know is relatively clean, like the roof or a door. Through the plastic, the surface texture amplifies. If it feels like 60-grit sandpaper, the car needs clay badly. If it's slightly rough, it still needs clay. If it's glass-smooth, you might skip it this time.
Most cars that sit outside in a city or near a highway need clay at least once a year. Cars kept in garages and washed frequently can go longer. There's no fixed schedule; the baggie test tells you more than a calendar does.
Clay grades and formats
Clay comes in different grades, and choosing the right one matters.
Fine/mild grade is the right starting point for most passenger cars with regularly maintained paint. It removes light contamination with very low risk of marring. Use this unless you have a specific reason not to.
Medium grade handles heavier fallout, old wax buildup, and paint that hasn't been clayed in years. It works faster but leaves slightly more micro-marring, which you'll want to polish out afterward.
Heavy/aggressive grade is for severe industrial contamination, overspray, and paint restoration work. It removes material quickly and will definitely need a polish follow-up. Don't start here unless medium grade isn't cutting through.
Clay also comes in formats beyond the traditional bar. Clay mitts and clay towels accomplish the same thing, and they're faster on large panels. The tradeoff is that if you drop a traditional clay bar, you throw it away and start with a fresh piece. A clay mitt is harder to inspect for embedded grit after a drop. If you're meticulous about technique, a mitt is convenient. If you're working on paint you care about, the classic bar gives you more control and makes contamination easier to inspect.
What you need before you start
- Clay bar (fine or medium grade for most cars)
- Dedicated clay lubricant spray, or a diluted detail spray at roughly 4:1 water-to-spray ratio
- Two or three clean microfiber towels
- A freshly washed and dried car
Do not use dry clay on paint. Ever. The lubricant is what keeps the clay gliding and prevents it from dragging grit across the clear coat in a way that leaves scratches. No shortcuts here.
How to clay bar a car: step by step
-
Wash and dry the car completely before you start. Clay can trap loose dirt and scratch paint if the surface isn't clean.
-
Work in a shaded area or indoors if possible. Direct sun dries lubricant too fast, and you'll be chasing it across panels.
-
Break off a section of clay about the size of a golf ball. Flatten it between your palms into a disc roughly the size of your palm. You're only working this piece; keep the rest in its packaging.
-
Mist a 2-by-2-foot section of the panel with lubricant until it's wet but not running. Flood it more than you think you need to.
-
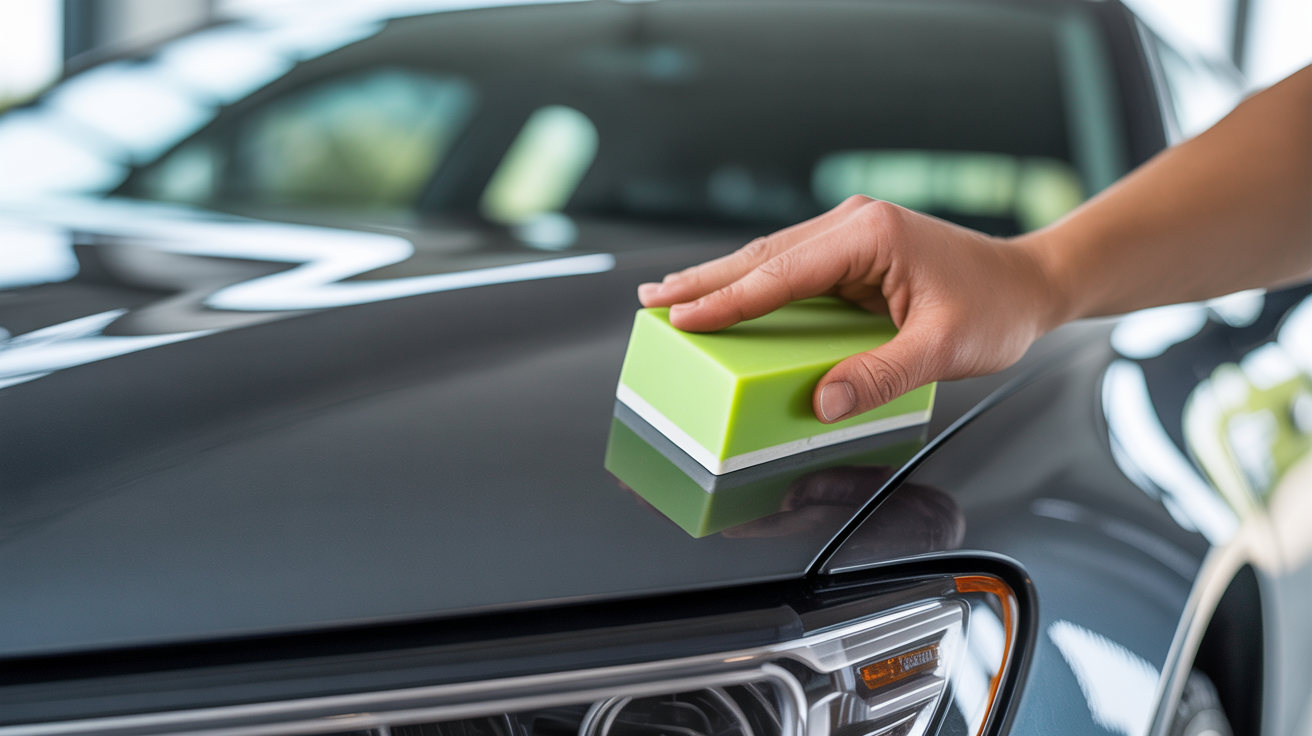
Place the clay flat on the paint and move it in straight, overlapping passes. Work left to right, then move down slightly and repeat. Don't use circular motions. Straight lines make it easier to identify any drag or sticking, which signals you need more lube.
-
Apply light, even pressure. The clay does the work; you don't need to press hard. If it's dragging and adding more lube doesn't fix it, switch to a medium grade clay.
-
After every few passes, fold the clay to expose a fresh face. Knead it until the contamination is worked inside and you have a clean surface contacting the paint. This is how you extend the life of one piece of clay across a full car.
-
Wipe the panel with a clean microfiber immediately after claying. Don't let the lubricant dry on the paint.
-
Run your hand (or the bag test) across the finished section. It should feel noticeably smoother. If there's still roughness, go over it again with fresh lubricant.
-
Move to the next section and repeat until the entire car is done.
If you drop the clay on the ground at any point, discard that piece. Even a parking lot that looks clean has embedded grit, and one pass with contaminated clay can leave deep scratches across a panel.
Do's and don'ts at a glance
Do:
- Use plenty of lubricant throughout; re-mist if the panel starts to dry
- Work in small sections so you can control the process
- Fold and knead the clay regularly to keep a clean face in contact with paint
- Wipe each section immediately after claying
- Follow up with a polish, sealant, or wax to protect the bare paint
Don't:
- Clay a hot or sun-baked panel (lubricant evaporates too fast)
- Use circular motions
- Use dish soap or water without a proper lubricant
- Skip the pre-wash; loose dirt turns the clay into sandpaper
- Reuse clay that's been dropped
- Leave clayed paint bare for more than a day; the surface is freshly exposed and needs protection
What to do after claying
A freshly clayed surface is clean, smooth, and also completely unprotected. All previous wax or sealant layers have been removed along with the contamination.
If the paint has swirl marks, light scratches, or oxidation, now is the ideal time to address them. Clay removes bonded contamination but leaves the underlying paint condition unchanged. Understanding when to polish versus compound next is worth reading through before you apply any correction product: polishing vs. compounding explained. If you plan to use a machine, how to use a dual-action polisher walks through setup, pad selection, and technique.
If the paint is already in good shape and you're satisfied with it, move straight to a wax, sealant, or ceramic coating. Don't leave it bare.
FAQ
How often should I clay bar my car? Most cars benefit from claying once or twice a year. Vehicles driven in areas with heavy rail traffic, near industrial zones, or parked outside year-round may need it more frequently. Use the baggie test rather than a fixed schedule.
Can I clay bar a brand new car? Yes. New cars often have transport overspray, brake dust from the test drive, and rail dust from shipping. Run the baggie test; many new cars fail it.
Does claying scratch paint? Done correctly with proper lubrication and clean clay, it shouldn't leave visible scratches. That said, fine marring is possible, which is why many detailers follow clay with at least a light polish on darker paint colors.
How long does the whole process take? Claying a full-size sedan takes 45 minutes to an hour if you're working methodically. An SUV or truck with more surface area takes longer. Don't rush it.
Can I use soapy water instead of clay lubricant? A diluted quick-detailer spray is the standard lubricant. Some detailers use a diluted car wash soap solution in a pinch. Don't use plain water; it doesn't provide enough slip. Don't use dish soap; it strips any remaining protection and can affect rubber seals.
How do I store leftover clay? Keep it in the original packaging or a zip-lock bag with a small amount of lubricant sprayed on it to prevent drying. Don't leave it in a hot car.