Paint Care & Polishing
How to Remove Swirl Marks From Car Paint
Learn how to remove swirl marks from car paint with the right products, pads, and technique. Covers machine polishing, hand methods, and protection.
Swirl marks are one of the most common complaints from car owners who take their paint seriously, and they're also one of the most misunderstood. A car that looks glossy in the shade can light up like a spider's web the moment it sits under the sun or a fluorescent shop light. The good news: swirl marks are fixable. The process takes time and the right products, but it's repeatable and something any careful enthusiast can do at home.
What swirl marks are and what causes them
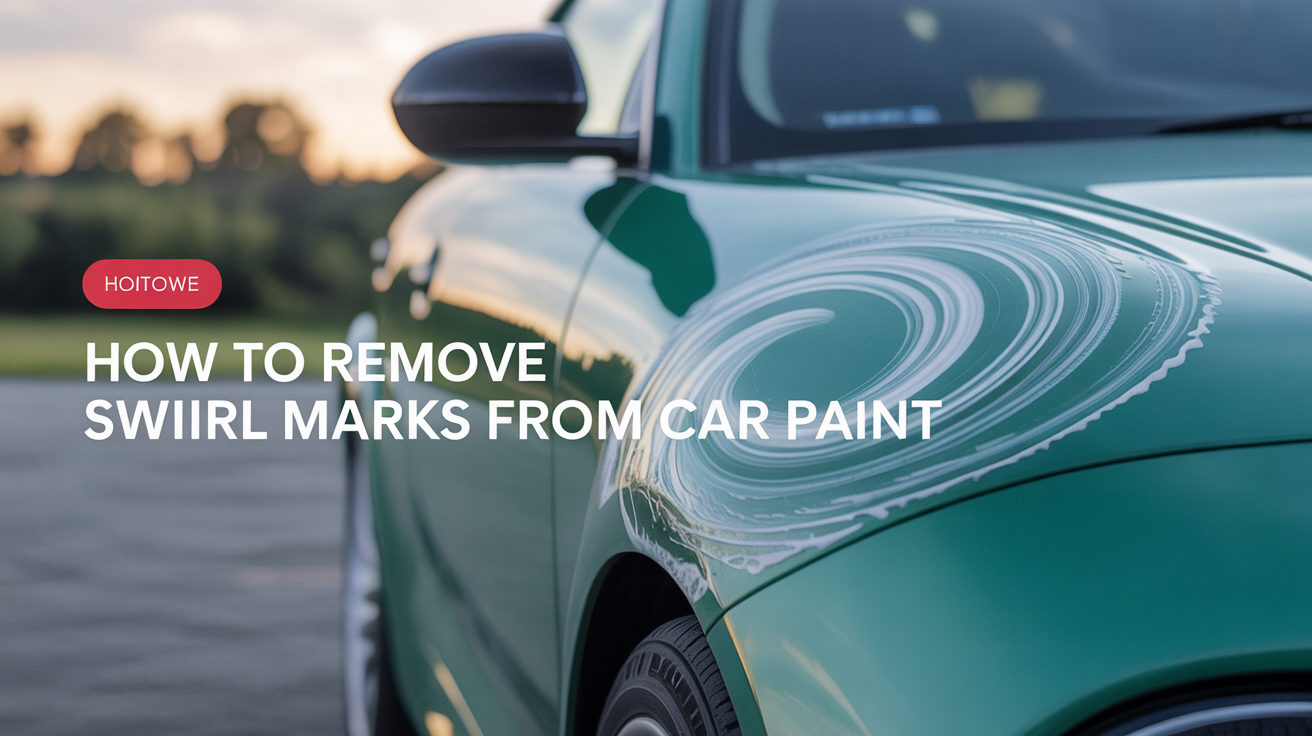
Swirl marks are fine circular scratches in the clear coat. They don't go through the paint down to the primer; they sit in the topmost layer, which is why they can be polished out without respraying anything. Under direct sunlight or an inspection light, the random-looking scratches reflect light in all directions simultaneously, which is what creates that hazy, webbed appearance.
The causes are almost always contact-related. Washing with a dirty sponge or wringing out a chamois on the paint drags grit across the surface. Automatic car washes with spinning brush rollers are a significant contributor. Even drive-through touchless washes use high-pressure water with detergent, but the post-wash hand towels employees use can still create fine marring. Dry wiping dust off a panel with a rag is another fast way to add scratches.
Darker colors make swirl marks more visible because light reflects off a dark background more dramatically. Silver and white paint hides them, but the scratches are still there.
Hiding vs. removing: knowing the difference
Before reaching for any product, you need to understand a basic distinction: some products hide swirl marks and others actually remove them.
Glazes and paint sealants that contain fillers work by temporarily filling in the scratches with polymers. The car looks better immediately after application, but a few washes later the filler washes out and the scratches reappear. This approach makes sense before a car show when time is short, but it's not a solution.
True swirl removal means physically abrading away a thin layer of clear coat until the scratches are level with the surrounding paint surface. That's what polishes and compounds do. The abrasives in a polish are graded by how aggressively they cut. Understanding this difference is also central to paint correction, which is the broader process of restoring paint clarity through machine work.
Assessing severity before you start
Not all swirl marks require the same approach. A quick look under a detailing light or a bright phone flashlight held at a low angle will tell you what you're dealing with.
| Severity | What you see | Approach |
|---|---|---|
| Light (Level 1) | Fine haze, mostly visible in direct sun | Fine polish + soft pad, hand or DA |
| Moderate (Level 2) | Clear spider-web pattern, visible at most angles | Medium polish + foam or microfiber pad, DA polisher |
| Heavy (Level 3) | Deep, defined scratches alongside swirls | Compound first, then finishing polish |
| Through clear coat | White or color showing in scratch | Spot repair or respray; polishing won't fix it |
A fingernail test on any scratch that looks heavier: drag your nail across it. If the nail catches, the scratch is likely too deep to polish out fully.
Machine polishing vs. hand polishing
Hand polishing is slower and produces less heat, which makes it safer for beginners, but it's also significantly less effective on moderate to heavy swirl marks. Your arm simply can't generate the consistent, sustained friction that a machine can. For light swirls on a single panel, a foam applicator pad and a fine polish can do a reasonable job. For a full car or anything beyond light marring, a machine is worth it.
A dual-action (DA) polisher is the standard recommendation for anyone learning. It oscillates in a random pattern that prevents burning the paint, unlike a rotary polisher that spins in a fixed circle and requires experience to use safely. The dual-action polisher guide covers technique and settings in detail, but in short: speed 3-4 for light polishing passes, speed 5-6 when you need more cut.
Choosing the right polish and pad combination
The pad and the polish work together. A cutting compound on a microfiber cutting pad is the most aggressive combination. A finishing polish on a soft foam finishing pad is the least aggressive. Most swirl removal jobs land somewhere in the middle.
For a typical daily driver with moderate swirls, a dual-action machine with an orange or blue foam pad and an all-in-one polish (a product that cuts and protects in one step) is a practical starting point. If you're unsure whether to compound first or go straight to polish, the article on polishing vs. compounding breaks down exactly when each is appropriate.
A few product notes:
- Softer paint (most Japanese and Korean cars) responds well to a fine polish. Don't start with a compound unless the swirls are severe.
- Harder paint (many German cars) needs a more aggressive polish or compound to achieve any real correction.
- Always test in a small, inconspicuous area first. An inner door panel or a jamb edge is a good spot.
Step-by-step swirl removal process
This sequence assumes you're using a DA polisher. Adjust the pad pressure steps for hand application, and plan on more passes.
-
Wash the car thoroughly. Swirl removal on a dirty car will create more scratches. A proper two-bucket wash with a grit guard is the baseline. Clay bar the paint after washing if you can feel contamination (run your fingers across the paint in a plastic bag; any roughness means embedded particles).
-
Dry the car completely. Polish doesn't work well on wet paint and some formulas streak if moisture is present.
-
Work in the shade. Direct sunlight heats the paint and causes the polish to dry too fast, leaving residue that's hard to remove.
-
Apply a few pea-sized dots of polish to the pad. Use less product than you think you need. Excess polish flings off the pad and creates cleanup work.
-
Prime the pad before the first panel. On a fresh pad, spread the polish at speed 1-2 across the section before increasing speed. This prevents the pad from flinging product.
-
Work in 18-24 inch sections. Overlap each pass by about 50%. Work the machine in slow, methodical lines, not circular motions. Four to six slow passes per section is typical.
-
Wipe the residue with a clean microfiber towel. Don't let the polish dry hard. Two to three minutes after finishing a section is a reasonable window.
-
Inspect under a light. Check correction before moving on. If swirls are still visible, do another set of passes. Chasing perfect correction in one go often leads to over-polishing.
-
Step down to a finishing polish on a soft pad for the final pass. Even if you started with a medium polish, finishing with something finer removes any light haze the cutting step left behind.
-
Protect the paint within 24 hours. Fresh, polished paint has no protection. Apply a wax, paint sealant, or ceramic coating before the car gets wet.
Protecting paint after swirl removal
Polished paint needs a protective layer, both to lock in the clarity you just worked for and to make the next wash safer. Carnauba wax provides a warm, deep look and is easy to apply, but needs reapplication every few months. Synthetic paint sealants last longer, typically four to six months. Ceramic coatings offer the most durable protection and make surfaces significantly easier to wash, though the application process is more involved.
Regardless of what protection you choose, the washing habits that caused the swirls in the first place need to change. Use a quality wash mitt, rinse it constantly, never let it touch the ground, and dry with a clean waffle-weave microfiber. The polish removes the past damage; the process change stops it from coming back.
FAQ
Can I remove swirl marks by hand without a machine polisher?
Yes, on light swirls. Apply a fine polish with a foam applicator pad using firm, overlapping straight-line strokes. It takes more effort and multiple passes, and you won't achieve the same level of correction as a DA polisher on moderate or heavy swirls, but it works for minor cases.
How many times can paint be polished before it's too thin?
Clear coat is typically 40-50 microns thick. A single aggressive polishing session removes roughly 1-3 microns. Most cars can handle several correction sessions over their lifetime before the clear becomes dangerously thin. A paint depth gauge lets you track remaining clear coat if you're doing multiple sessions.
Will swirl marks come back after polishing?
The ones you removed won't come back. New ones will form if washing habits don't change. A paint protection film or ceramic coating adds a sacrificial layer that reduces the rate at which new scratches accumulate, but no coating makes paint scratch-proof.
Does car wax remove swirl marks?
Standard wax doesn't. Wax sits on top of the paint and doesn't abrade the clear coat. Some waxes contain very mild fillers that temporarily mask light swirls, but they're not removing anything. Polish is what removes swirl marks; wax protects the surface afterward.
Is it possible to make swirl marks worse during polishing?
Yes. A dirty pad, too much pressure on soft paint, or using a product that's too aggressive for the pad can all introduce new scratches. Always start with the least aggressive combination and work up. Check your pad frequently and knock out any dried product or debris with a pad cleaning brush.