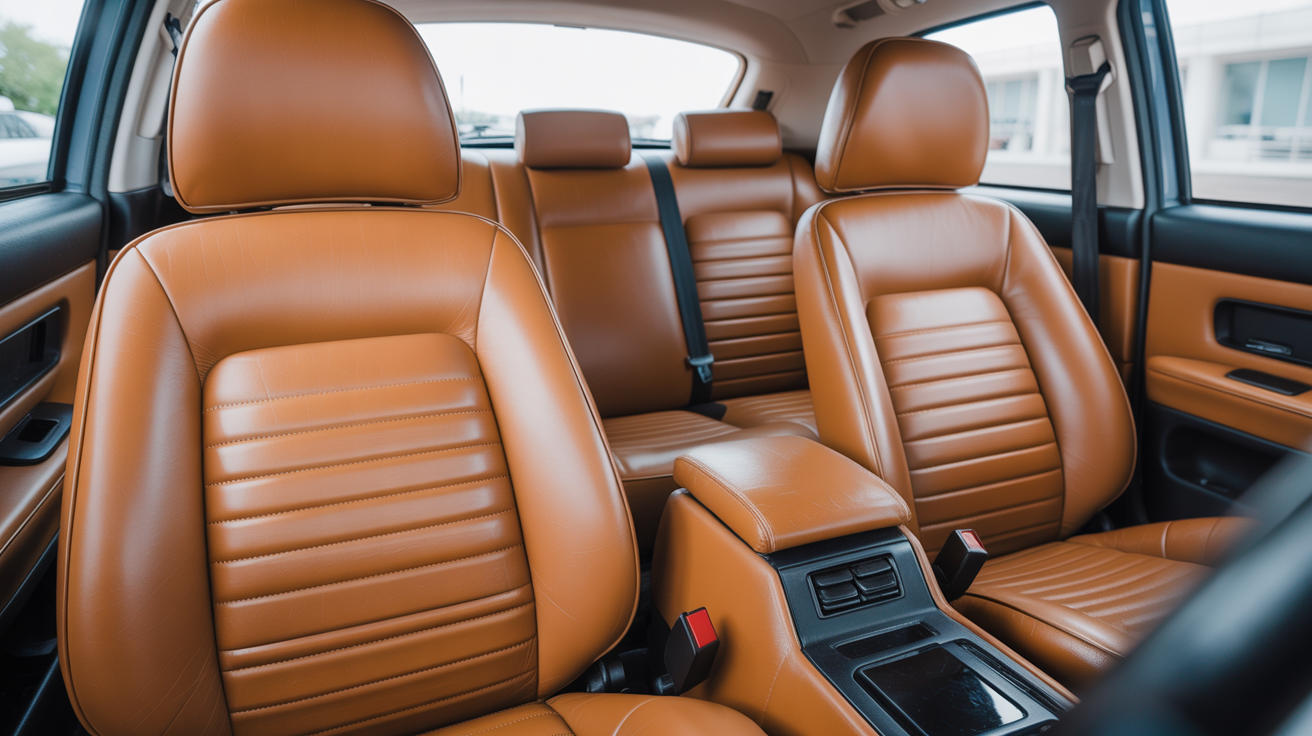
Interior Detailing
How to Clean Leather Car Seats
Learn how to clean leather car seats properly using pH-neutral cleaner, soft brushes, and conditioner to protect and restore your interior.
Leather seats look great when they're cared for and rough fast when they're not. Dirt, body oils, and sunscreen work into the grain over time, and by the time you can see the damage, you're already past easy fixes. The good news is that cleaning and conditioning leather isn't complicated. It just requires the right products and a bit of patience.
This guide covers everything from identifying your leather type to protecting perforated seats without ruining the perforations.
Coated vs. uncoated leather: why it matters
Most factory leather is coated. The manufacturer applies a polyurethane or pigmented finish over the hide to protect it from spills and UV damage. This coating is what you're actually cleaning in most cases, not raw leather. You can confirm this by pressing a drop of water onto an inconspicuous spot: coated leather beads the water; uncoated (aniline) leather absorbs it within seconds.
Aniline and semi-aniline leathers are softer, more breathable, and far more susceptible to staining. They need gentler products, minimal moisture, and more frequent conditioning. High-end European vehicles sometimes use aniline leather, but it's uncommon in most daily drivers. If you're unsure, check your owner's manual or contact the dealer before applying anything.
For coated leather (the type in most vehicles), a pH-neutral leather cleaner is the right tool. Avoid household cleaners, dish soap, and alcohol-based sprays. These strip the protective finish and dry the hide underneath.
What you need before you start
Running through a quick supply check saves trips back to the garage mid-job.
| Step | Product | Tool |
|---|---|---|
| Pre-wipe loose dirt | Water or quick detailer | Microfiber cloth |
| Clean the leather | pH-neutral leather cleaner | Soft-bristle brush or microfiber |
| Wipe residue | Clean water rinse | Fresh microfiber cloth |
| Condition | Leather conditioner (no silicone) | Foam applicator or microfiber |
| Protect (optional) | Leather sealant or cream | Microfiber buff cloth |
A few notes on tools: the brush matters more than most people expect. A dedicated leather brush, something in the 5,000-8,000 bristle range with soft nylon tips, agitates the cleaner into the grain without scratching the coating. Stiff brushes meant for carpet or wheels will leave marks. If you don't have a leather brush, a clean toothbrush works for seams and stitching; a foam pad handles the flat panels.
Before anything touches the seat, do a test in a hidden spot. The lower back corner behind the seat track is ideal. Apply cleaner, let it sit 30 seconds, wipe off. If the color lifts or the texture changes, stop and research your specific leather type further.
How to clean leather car seats step by step
Start with the seats out of direct sunlight. Heat makes cleaners dry too fast, leaves streaks, and accelerates any residue that works into crevices.
-
Vacuum the seats thoroughly. Remove loose debris from seams, stitching, and the crease where the seat back meets the base. Trying to clean over crumbs just grinds them in.
-
Spray a small amount of leather cleaner onto your brush or applicator, not directly onto the seat. This gives you control over product distribution and prevents soaking. For reference, you want the surface slightly damp, not wet.
-
Work in sections roughly 12 by 12 inches. Scrub gently in circular motions, then follow with straight strokes along the grain. You'll see the brush lift light discoloration as it works. Don't press hard; the agitation does the work, not the pressure.
-
Wipe the section with a clean microfiber immediately. Don't let the cleaner dry on the surface. Fold the cloth frequently so you're always picking up residue on a clean side.
-
For stubborn grime in seams and stitching, a toothbrush dipped in cleaner works well. Seam buildup is often the source of that dark-line look around cushion edges.
-
Repeat across the full seat: cushion, seat back, headrest, bolsters. The side bolsters get the most contact from getting in and out, so expect them to need a second pass.
-
Follow up with a barely damp microfiber to remove any remaining cleaner residue. You want the surface clean and dry before conditioning.
A note on perforated seats
Perforated leather is common on sport trims and heated/ventilated seat packages. The holes punch straight through the coating to the backing material, which means excess liquid soaks through directly into the seat foam and can cause mold or damage to the heating elements underneath.
For perforated panels, use a spray bottle to mist the cleaner very lightly, or apply it to the brush and keep the brush close to dry. Work faster, wipe immediately, and never let liquid pool on or around the perforations. Same rule applies to conditioning. Use a thin, even coat and work it in quickly.
Why conditioning matters after cleaning
Cleaning removes contaminants. It also removes some of the oils that keep the leather flexible. Skip conditioning and the material dries out, becomes stiff, and eventually cracks along flex points like the seat-to-back crease and bolster edges.
A good leather conditioner does two things: it replenishes those oils and it adds a thin protective layer that resists the next round of dirt. Look for conditioners without silicone. Silicone makes leather feel slick temporarily but doesn't actually feed the material, and it leaves a residue that attracts dust.
Apply conditioner with a foam applicator or microfiber using light, circular motions. Work it evenly across the full panel. Let it absorb for 10 to 15 minutes, then buff off any excess with a clean cloth. The seat should feel soft and slightly matte, not greasy.
If your seats have light cracking already, conditioner can improve it but won't reverse it fully. Deep cracks need a leather repair kit or professional work.
How often should you clean leather seats?
A light wipe-down every two to four weeks keeps surface oils from building up. A full clean and condition every three months is usually enough for a regularly used vehicle. If you drive in hot climates, park outside frequently, or carry passengers with a lot of bare-skin contact (shorts in summer), move that to every six to eight weeks.
The payoff is significant. Leather that gets consistent care holds its color, stays supple, and doesn't crack for well over a decade. Leather that never gets conditioned often shows visible wear inside five years.
For a full approach to the interior beyond just the seats, see our guide to how to detail your car interior. If you're also dealing with fabric sections or a mixed-upholstery cabin, the complete guide to cleaning cloth and leather seats covers both surfaces side by side. And if you're working through a stubborn stain that cleaning didn't fully lift, removing stains from car upholstery goes deeper on specific stain types and targeted treatments.
FAQ
What cleaner is safe for leather car seats?
Use a pH-neutral cleaner made for automotive leather. Products labeled pH-balanced or pH 6-8 are safe for coated leather. Avoid anything with bleach, alcohol, acetone, or ammonia. When in doubt, check the product's SDS sheet or test on a hidden spot first.
Can I use baby wipes or household wipes on leather seats?
Most baby wipes and household cleaning wipes contain alcohol or fragrance that dries out leather over time. They're fine for a quick spot clean in an emergency, but they shouldn't be part of a regular routine. Use them sparingly and follow up with conditioner if you do.
How do I get body oil stains out of leather seats?
Body oils accumulate on the seat back and headrest contact areas. A slightly stronger concentration of pH-neutral cleaner, applied with a soft brush and light agitation, usually lifts them. Repeat the process two or three times on stubborn buildup rather than scrubbing harder in one pass. Conditioning afterward helps restore the surface.
Will leather conditioner make my seats slippery?
A thin, even application of a quality conditioner should not leave seats slick. If your seats feel greasy or slippery after conditioning, you used too much. Buff off the excess with a clean microfiber. Silicone-based products are the main culprit for persistent slipperiness, which is another reason to avoid them.
My leather has started cracking. Is it too late?
Surface cracking or fine crazing can often be minimized with deep conditioning over a few sessions. Apply conditioner, let it absorb, and repeat the next day. For deeper cracks or peeling, a leather filler and colorant kit is the next step. These are sold at most auto parts stores and take some practice to blend well, but they're effective on small areas. Extensive damage typically warrants professional restoration.